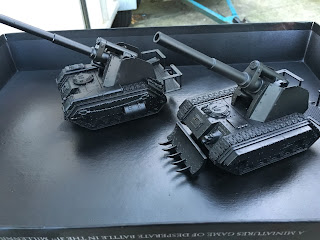
This was largely due to the gun shield if I am honest. I had bought the Vanaheim upgrade shield from Forgeworld in 2003, but unfortunately I never picked up more than one, and they have since discontinued the piece. My basilisks have fallen to wrack and ruin, and I eventually cannibalized them for other projects.
It was only when I was at a hobby sale last weekend that I found a pair that a fellow Guard commander was getting rid of. I had to have them. They were about a tenner a piece. I dug out my plasticard and set to work on a new gun shield based loosely on the Vanaheim piece.
I test fitted the vanaheim Shield to give me an idea of what I wanted. I decided to go a little taller with my own shields.
The first thing I did was to take the curved baces off the old shield. I cut away all the extra parts I didnt want, which left me with those central beams. I cut these below the eighth rivet up.
I then built a small platform the fit tight with the hull that would allow the shield to rest on.
To this I attached the upright supports for the flat plastic sheets that would provide the armour.
With the first two pieces in place, I then filed down the edges so the remaining parts would fit snuggly, tapering them at 45 degree angles.
Above, you can see I used a scrap of cardboard to make a template for the sides. at this point I trimmed the front armour panels to make sure they would line up well.
I traced the template and made the extra side skirts I needed.
You guessed it...Rivet time!
I left the shield un attached for painting
Thats us up to the end of the build. Painted pictures coming soon!


Nice tutorial
ReplyDeleteReally good idea, awesome job :)
ReplyDeletegreat job!
ReplyDeleteExcellent concept and execution.
ReplyDeleteAwesome! I really dig how those turned out!
ReplyDeleteThanks. I've been painting away at them, so I'll have pictures for you soon. Would like an Armageddon pattern basilisk as squad battery commander.
ReplyDelete