
Well as the name describes, I've been creating a custom Blood Bowl dugout for my Dwarf team. This first part takes us through the making of the Scoring, turn counter and re-roll section of the dugout.

Let me start by saying I have always had a soft spot for Blood Bowl, and recently, by playing the league with Tom O'Reilly of Unite All Action, I have definitely rekindled my love of this game.
For the last year we have been playing a small league, consisting of six games (as you can see the games where quite spread out!). My Dwarves did well, coming close to winning the league, until the last game, but ended up in third place (out of 4, D'oh!). We did get the most touchdowns from a single player though.

So with their first season behind them, I felt they deserved a custom Dugout. As I was looking around my bits boxes, I noticed I had an extraordinary amount of movement trays and warhammer bases, and this gave me my inspiration. I hadn't been looking forward to cutting up individual squares of plasticard, so I thought these bases might be a painless way of creating a simple, but usable turn table.


 As you can see in the pictures above and below, I added thin plasticard to the tops of the cavalry bases. I wanted not only to cover the slots, but also to create a stone slab effect, and this would be much easier to produce with a smooth surface.
 I trimmed the edges of the plasticard and then roughly scored and chipped them, creating a worn stone effect around the edge. I purposely didnt do too much to the centre as I want to put the words there.
 And below you can see the 'Stone slabs' in position...


 I then simply added a few rough stone patches, partly to enhance the look, but mostly to cover joins in the movement trays and the odd circular mold lines on the movement trays....

...Which are visible in the picture below...


I then wanted to do something slightly different with my turn counter and score counter. Quite often people build wonderful dioramas for these, however, I wanted to keep mine quick, but effective. I looked at other turn counters and noticed that they all obscured the number they were on, so I simply took a large infantry base...


Let me start by saying I have always had a soft spot for Blood Bowl, and recently, by playing the league with Tom O'Reilly of Unite All Action, I have definitely rekindled my love of this game.
For the last year we have been playing a small league, consisting of six games (as you can see the games where quite spread out!). My Dwarves did well, coming close to winning the league, until the last game, but ended up in third place (out of 4, D'oh!). We did get the most touchdowns from a single player though.

My Runner, The highest scoring player in the North Down Blood Bowl League!
So with their first season behind them, I felt they deserved a custom Dugout. As I was looking around my bits boxes, I noticed I had an extraordinary amount of movement trays and warhammer bases, and this gave me my inspiration. I hadn't been looking forward to cutting up individual squares of plasticard, so I thought these bases might be a painless way of creating a simple, but usable turn table.

For the whole dugout I was inspired by this image above. I figured that when I get both the turn counters and the dugouts built, it would be nice to have a base they can slot together into.
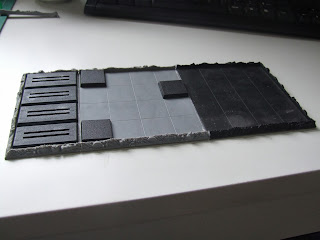
So onto the build... I started by taking three of these old style movement trays, although the new custom moving trays would work as they have the same lines scored into them.

I cut one completely in half, one I removed two edges either side, and the last I took off just one side, like this...

I then glued them together and added a 2mm thick base of plasticard to add strength...

In the picture above I had measured out which bases would work. The cavalry bases were going to be used to write, Score, first half, second half and, re-rolls. On each individual square I would write the numbers 1-8. and the large infantry bases would be used as the counters.


Next up, I scored the lines in the board with a sharp sculpting tool, to help create the old stone slab look. This isn't required, but I thought it would look better once I got started on the painting.


...Which are visible in the picture below...

So far so good...

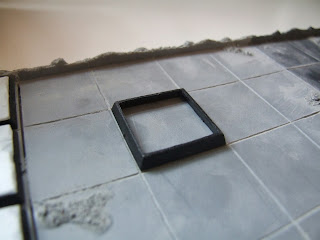
I then wanted to do something slightly different with my turn counter and score counter. Quite often people build wonderful dioramas for these, however, I wanted to keep mine quick, but effective. I looked at other turn counters and noticed that they all obscured the number they were on, so I simply took a large infantry base...

And cut out the centre. I plan to paint this quite brightly coloured. Its simple, but I think it was the most effective solution...

That is all for now. Next time I will be focusing on my team re-roll counters. With these I'm looking to add a little bit of height to the piece.

Okay that's it, you definitely can't have all the fun it's about time I did one for myself.
ReplyDeleteLooking forward to seeing your dugout! (Something sounds wrong with that phrase!) :)
ReplyDelete